My Los Angeles Theater Panorama
Who Framed Roger Rabbit is one of the seminal movies of my life and holds up better than nuclear fuel rods, so when I heard that it was going to be screened at the iconic Los Angeles Theatre in Downtown LA, I knew I had to go see it and also capture a panorama of the interior. We all know the Los Angeles Theatre well from a variety of movies, TV shows, and excellent commercials. For example:
Okay that’s enough pop-culture referencing for the moment. The point is, you probably knew about this place, and as theaters go, it’s pretty epic inside, although not in the greatest of shape, as are none of the formerly grand Broadway movie palaces of the early 20th Century.
The theatre is part of the LA Conservancy’s annual ‘Last Remaining Seats’ festival that screens classic cinema in formerly glorious and ornate movie palaces mostly located in the Broadway Theatre District in Downtown Los Angeles, but also in other locations around Los Angeles as well. Previously, I had seen Citizen Kane at the Orpheum Theatre. Not sure which theatre I’ll see something in next time. For better or worse, the conservancy did not let us in to the theatre until 45 minutes prior to the screening of Roger Rabbit and so I had limited time to document the interior, but then I remembered: technically, the glass is always full and I can always come back. I shot this hasty video as I was more interested in photos this time out. Perhaps at a future screening, I’ll get better video:
What I really wanted to get, however, was a humdinger of a panorama of that glorious interior (barbershop quartet notwithstanding) and I put to use many bits of wisdom I had learned over the years from taking many many many less-than-satisfactory-to-me panoramas.
The first thing I learned was:
1. NEVER EVER EVER take a panorama with your smartphone. They suck. Of course I say that based on the assumption that you take photos with something other than a smartphone when you go out. Sure, a smartphone can stitch together a panorama in real time but the end result is incredibly distorted, has no additional stops of dynamic range, makes use of heavy JPG compression, and has to be quite cropped to account for variations in the user’s y & z axis jitters when panning. I could continue onward as to why smartphone panoramas are bad bad bad, but I won’t. Moving on.
2. While you should never use your iPhone, you should use your iPhone’s orientation (ie vertical) for taking panoramas. A normal camera’s horizontal bias (ie 4:3 or 3:2) may seem like the way to take panoramas, but this leads to a lot of distortion and eventual cropping of image data at the top and bottom of your photo and if the point is to capture as much area as possible, then you want to take more pictures in a 2:3/3:4 format to get maximum coverage.
2. Identify the center of your panorama and take a reference photo first to determine the look and focus and feel of the end result. Switch to full manual mode. Set your focus, shutter speed, aperture, ISO. All the things. Now take the picture of the center, and do not change any settings. Including focus. This is important. Most helper-functions on digital cameras have you start your panorama from the left or the right side of your perceived frame and base their settings for the entire panorama off of how the far left or right of the picture looks. The helper function is also typically limited to jpg output which crushes bit depth, compresses colors, bakes in white balance, and a slew of other undesirable things to your pictures, so that’s why we go full manual for this. Your camera is now ready.
3. Depending on your disposition, now start taking your photos from left to right, or right to left (in your camera’s RAW format). Remember. Your camera’s settings are locked from step 2. You haven’t changed anything right? Good. Here’s how many photos I took to capture this panorama:
![]()
4. Load your raw files into your editor of choice. Mine was Adobe Lightroom CC Classic. (Note: Lightroom CC can’t handle this project. Adobe stripped features from the newer version which baffles me).
5. Again, process your middle photo first to taste, and then use those settings for every other photo in the series. Lightroom makes this very easy with the standard ‘cmd+c’ and ‘cmd+v’ allowing you to copy+paste your settings from one photo to another. Very natural.
6. Merge your photos. Again, this is handily done in Lightroom or Photoshop. I prefer Lightroom because it preserves raw data and still allows you to perform additional non-destructive final adjustments to your merged photo.
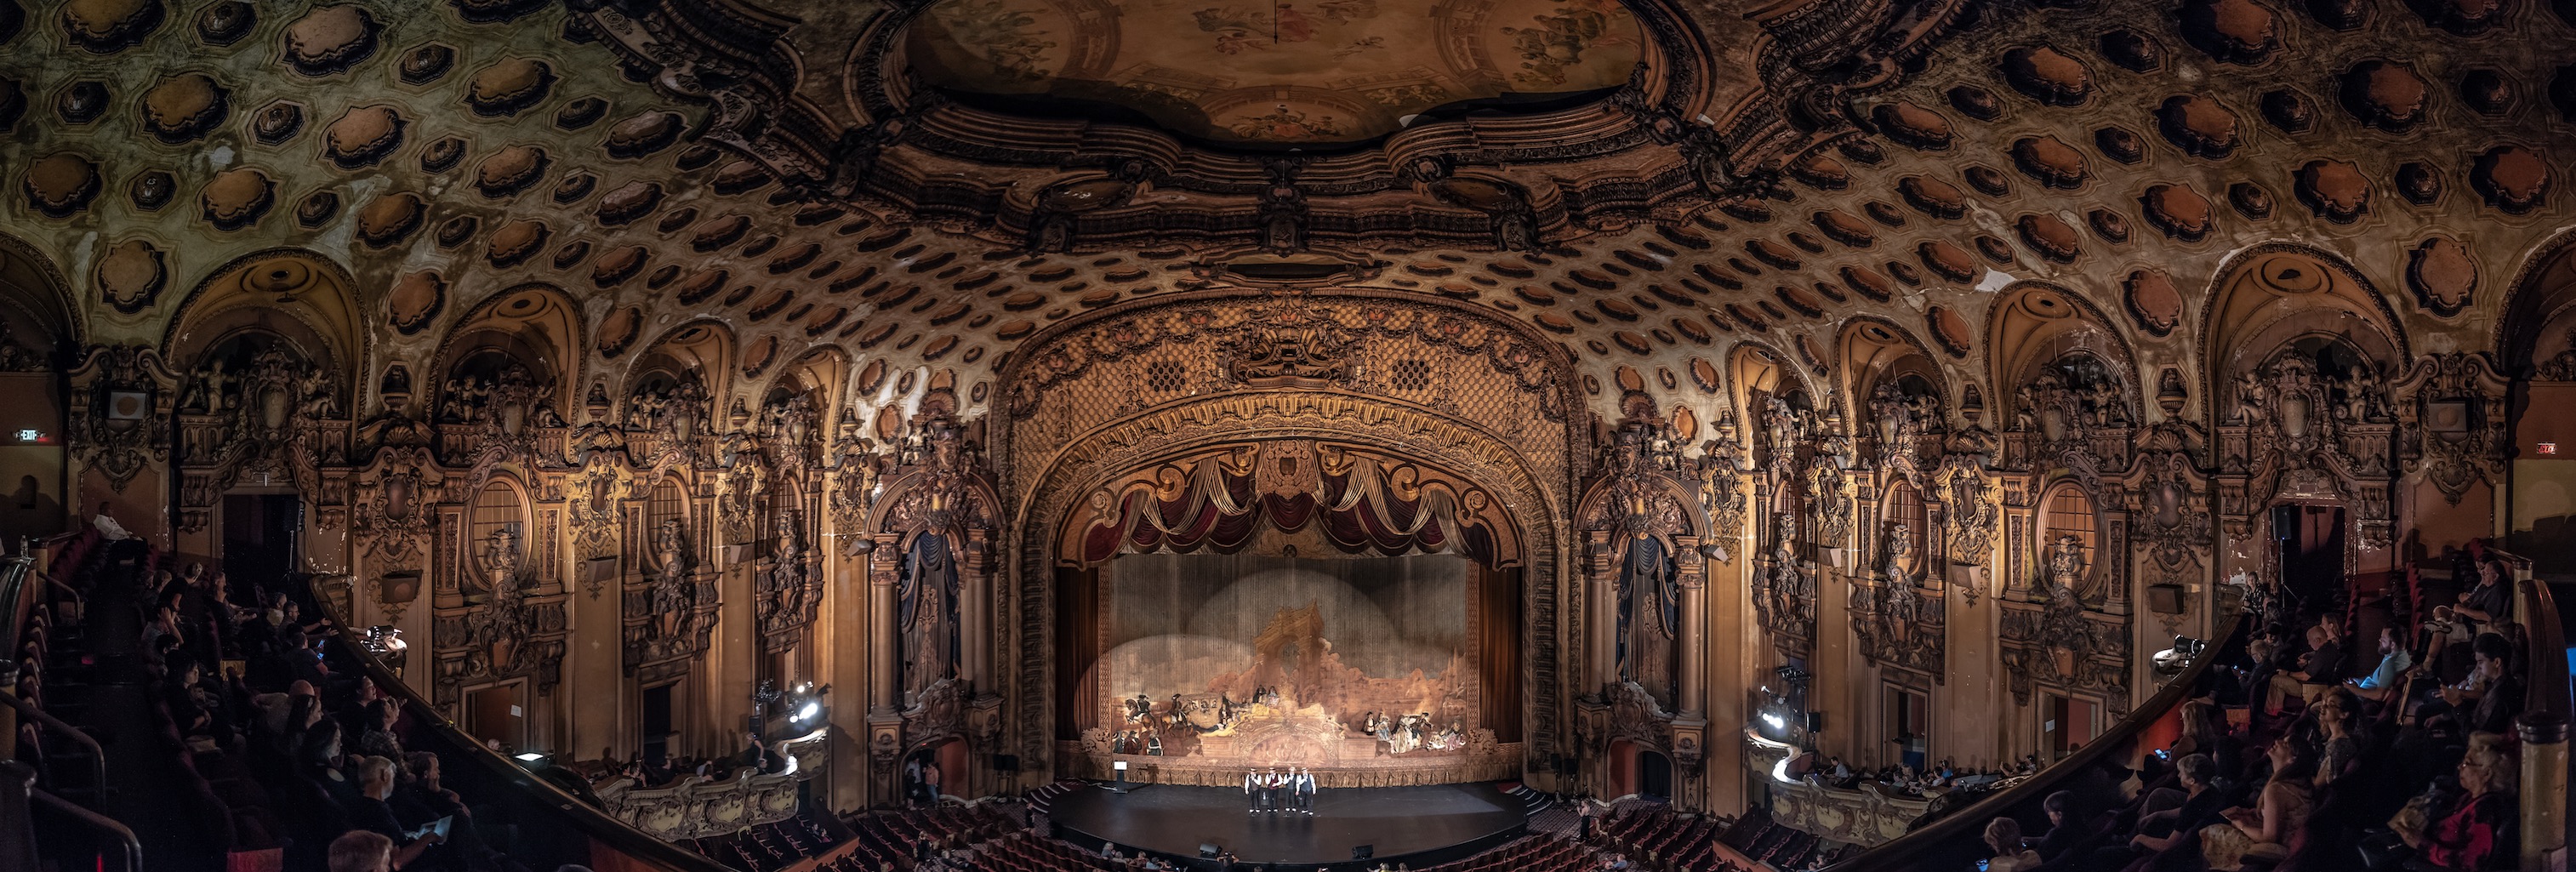
7. Happy with it? Good. Here’s how it came out:
And that, folks, is how I take panoramas these days. I guess you could just use your phone too though.
Seeing Who Framed Roger Rabbit was great as well. In person to take about the film was Don Hahn, Charlie Fleischer, and Joanna Cassidy, and the print used was an old film print instead of a digital file. This was nice because it fit with the theme of the old movie palace, and the visual effects held up better since they were designed to work in the more forgiving 35mm Vistavision format. When you watch a restored HD or 4K version, you can spot the old effects. Notsomuch here. It was great.
I do hope to return to see more flicks in the grand movie palaces downtown. If you’d like to know more about the LA Conservancy and Last Remaining Seats, please do check them out.